Leo's Assignment 2: Parametric Rhino Wing!
Here is all the documentation for assignment 2!
Here is all the documentation for assignment 2!

Available on github.com at https://github.com/LeoSalemann/LeoSalemann.github.io/tree/master/hcde598/hw02
Right, then. We're supposed to re-create homework 1 parametrically, in Rhino with Grasshopper. The basic idea is to parametrically handle arbitrary thicknesses, and to use two thicknesses in the actual build. I think Imma have to:
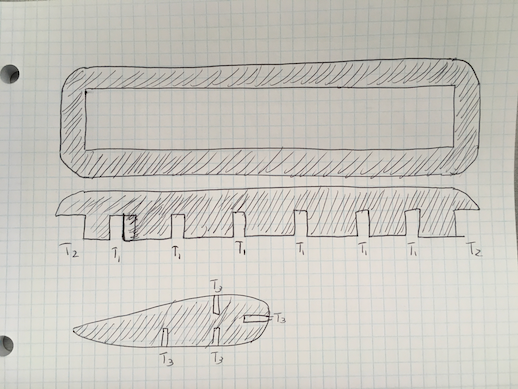
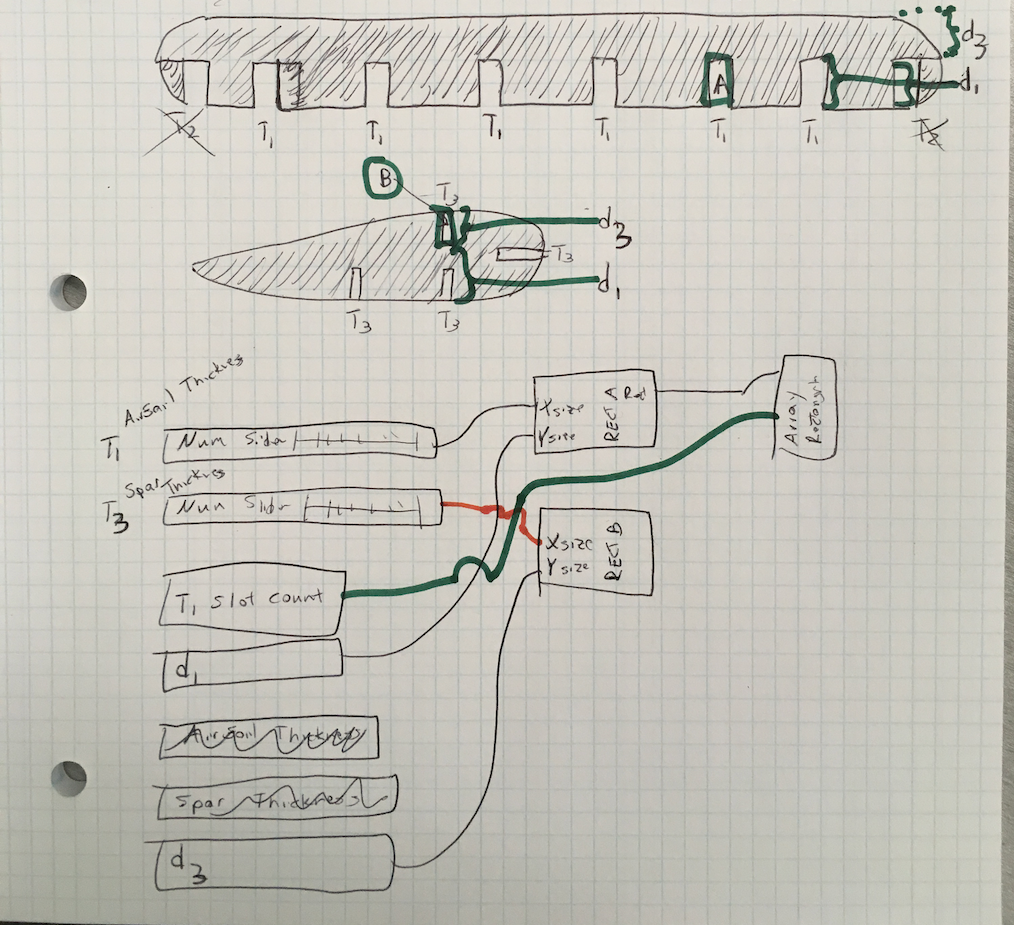
Okay, so if I go with the original design, I have three parametric thicknesses at least:
Another thing I could do is ditch the hoop entirely, and just go with notched beams at the leading and (maybe) trailind edges. It'd be interesting to see what it's like to assemble that way, and home strong the finished product is, so I'll probalby do that.
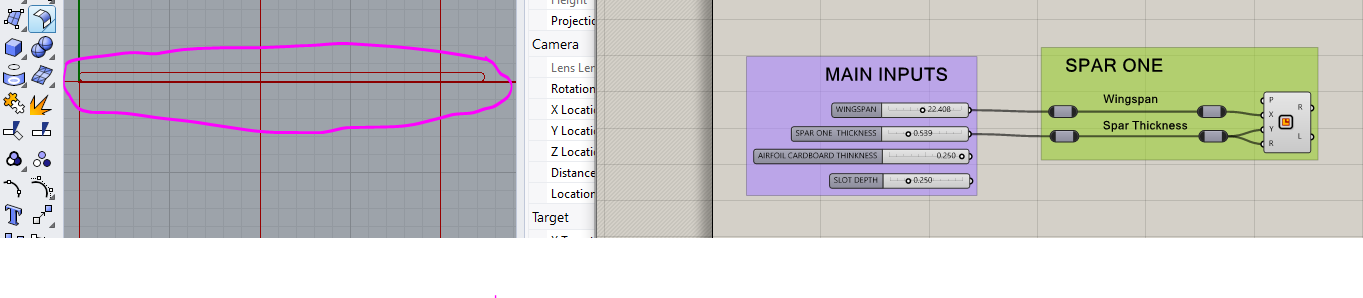
So anyway, based on what little I know of Rhino Grasshopper, my visual programming diagram thingy would look somehting like this (below). To make things easier (and lighter!) I've removed the "hoop frame" so I'm only dealing with spars and airfoils. Consequently, I no longer have to worry about T2 from the prior sketch, and can concentrate on T1 and T3.
I've also added d1 and d3 so the cutout rectangles can have lengths to go width their widths. Rectangle A (for the spar) is d1 x T1; Rectangle B (for the airfoil a.k.a. rib) is d3 x T3. Spar height and airfoil height (I'll reserve "thickness" to describe material thickness" will both be d1+d3. When I work up spars for the other slot locations on the airfoil, the airfoil slots will always be d3 x T3, but the d1 used on the spars will vary.
A quick rework of my 3-rib prototype suggests it'll still be plenty strong.

The tricky part in all this will be getting grasshopper to "read" my custom airfoil shape, cut notches in it, and replicate it. So having done this sketching, thinking, writing exercise, I know that I need tutorials covering:
Okay last night was about thinking and sketching; tonight is tutorial time! But first .... we've got an actual assignment description now. I need:
Pretty slow and wordy; got a few nuggets out of it though.
All in all, thought I found the ModelLab primer slow and wordy. The little mini tutorials that come up when you first start Grasshoper look good and succinct, though.
I didn't get through nearly enough tutorials the other night, but at least I have some leads. Gonna do those ones from the Grashopper start page, as well as the Ramboll Blog Grashopper Tutorial suggested by Kimberly Dzuibinski.
Let's start with the tutirials Grashopper shows at startup time. Same ones you can get to from Help > Tutorial Files.
01 Simple Input and Maths This is more like it. Really digging the open-ended exploratory feel of these. Got a good grip on how to use panels for comments, and the sprectrum of input types avaialble to me.
02 Interpolating Values This on3 helped me wrap my head around how to connect geometry from Rhino (Pt) to Grasshopper. Playing with colors was way too fun.
03 Wires & Conversions Moving right along. The "Hold down shift" trick will come in handy when connecting multiple wires, the XYZ to Point conversin might come in handy too.
04 Polynomial Grpahing with Derivatives Okay, this one's funky. Probably won't go this hardcore unless I start defining NACA airfoils from their base equations. Might come back to this one to help read & understand Dr. Gareth Paterson's NACA Series 4 Airfoil generators
05 Measure and Display Values I like the title of this one. A little hard to grock, but I think I'll be able to use some of this when I want to measure positions off my airofoils, like d3 and d1 below.
06 Adaptive Pattern within Shape Thought this would be out of my league at first glance, but I can kinda see how Join, InCurve, and Cull could be used to create my rectangular "slots" and clip them into my airfoils.
07 Column Arcade Oooh ... repeating patterns! Hmm... I dunno. There's a lot of fuky stuff going on in this one, and the simple "replicate this shape in XY for N times" isn't jumping out at me. probalby need to look elsewhere for that.
Right, then. Feeling a bit less noobish, but still wanna look at the Ramboll Blog Grashopper Tutorial that Kimberly Dziubinski found. Skimmed the first page or tow, but found some good nuggets starting right before section 3.
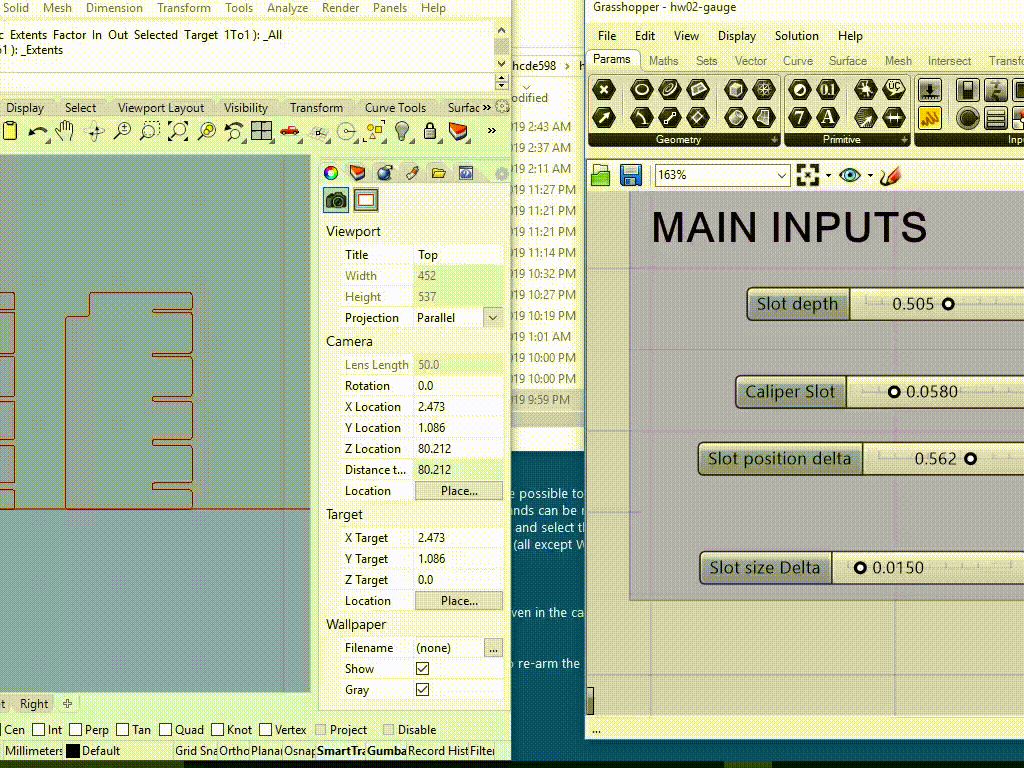
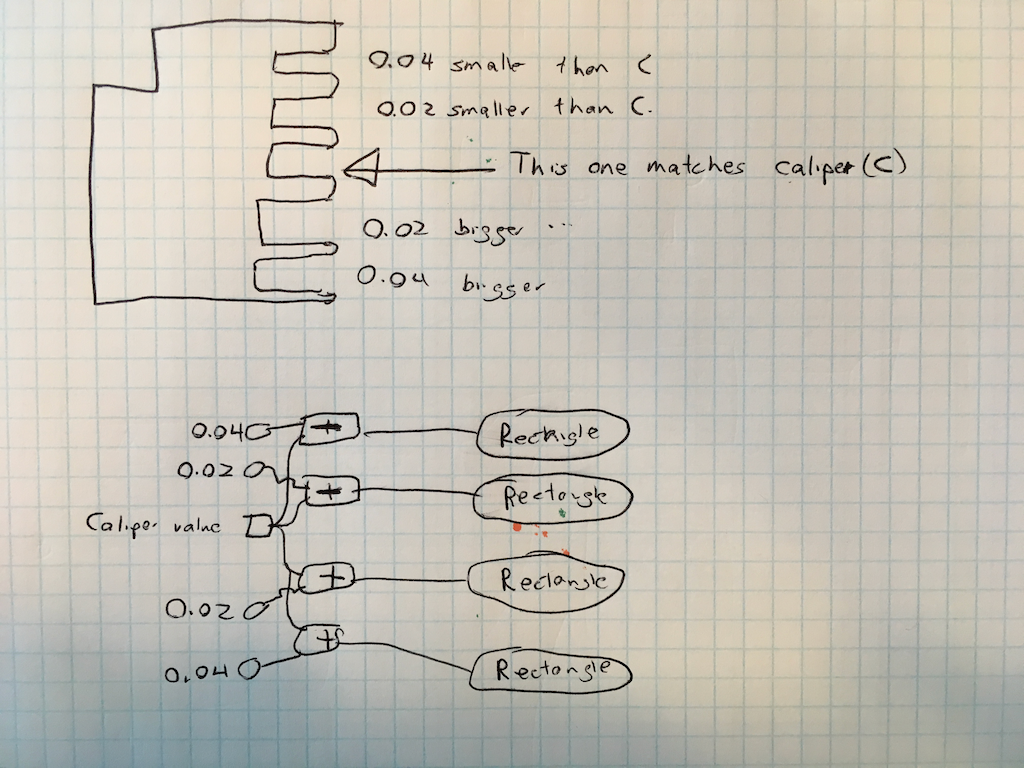
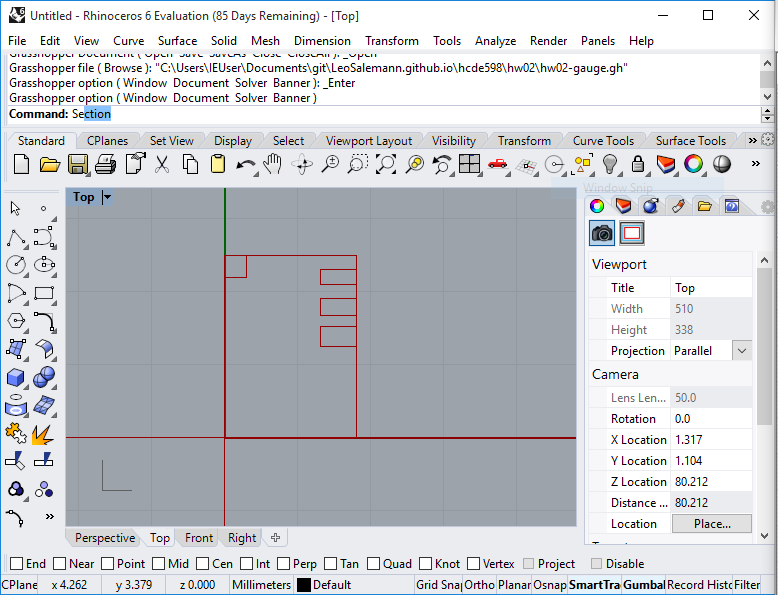
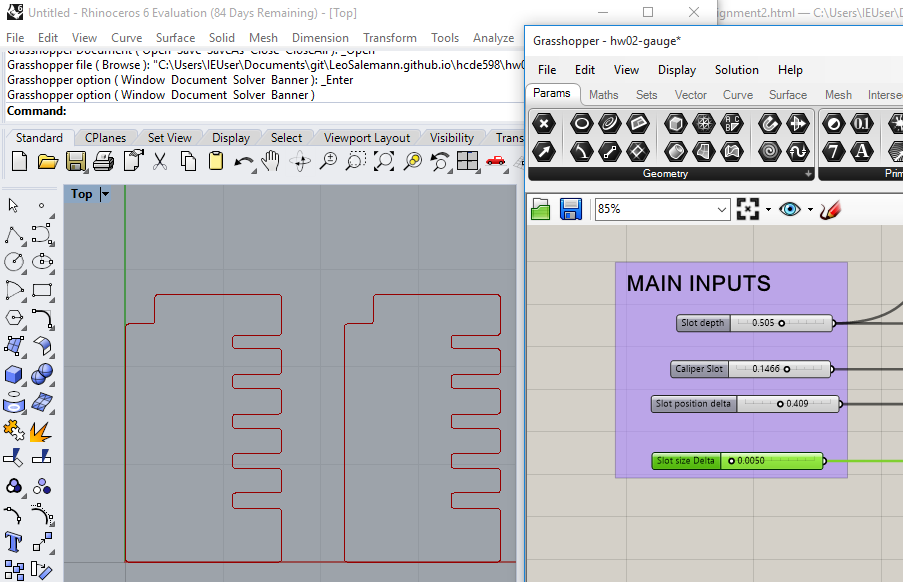
I'll start with a gauge. It'll be nice have a middle slot that matches my caliper reading, and the rest auto-calculate like this:
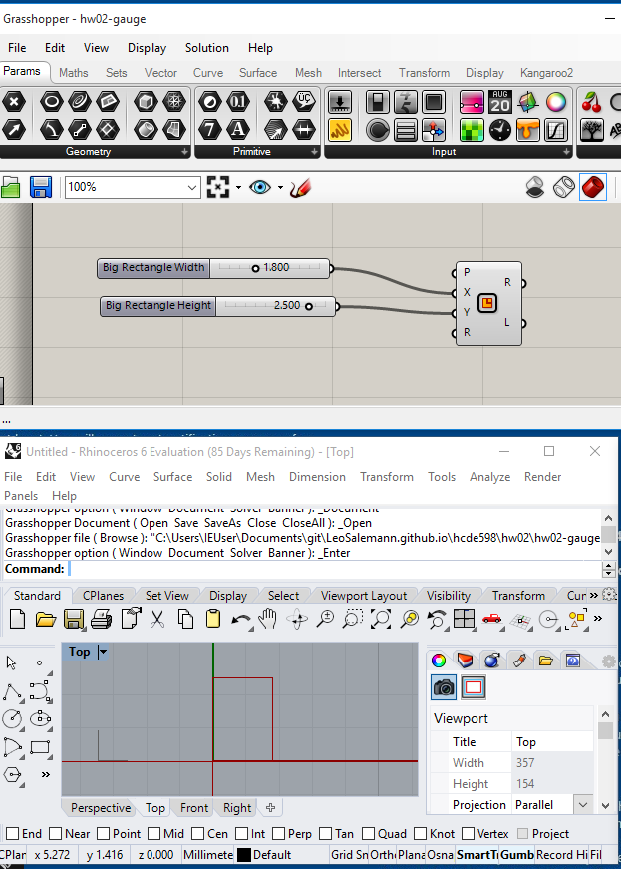
Okay, let's go into Grashopper for real this time. A couple number sliders a Rectangle component and ...
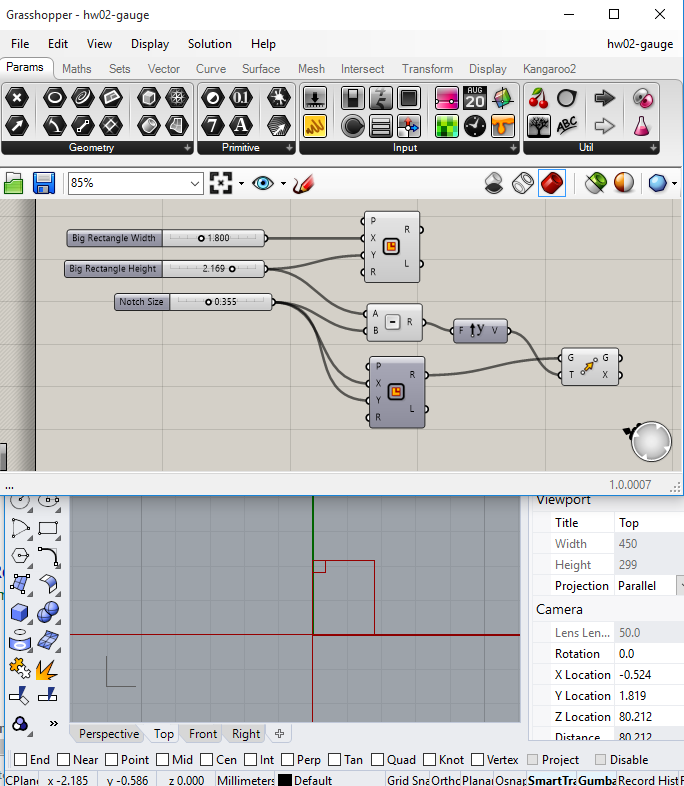
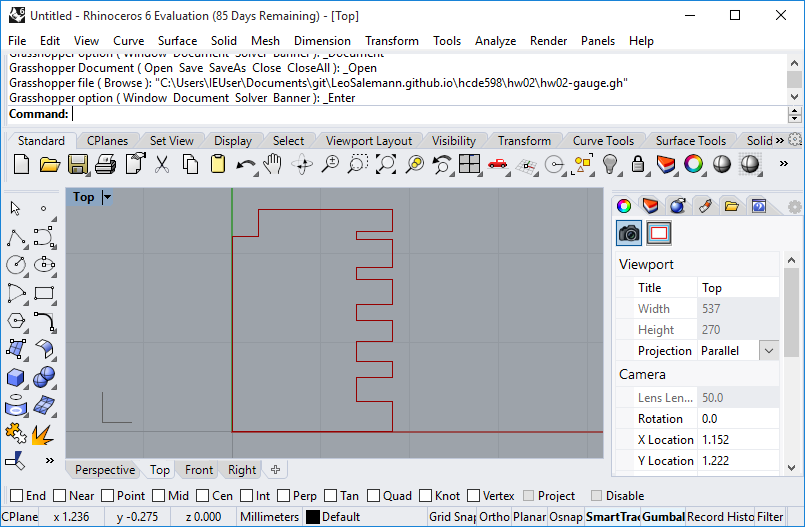
Now let's see if I can re-create ... THE NOTCH. Last time it was about 0.3 inches. Use hard-coded number param, grab the rectangle dimentions, a bit of math, and ... I don't know why that was so hard. The bloody Move wouldn't work -- kept saying "this component is currently inactive." Finally I just went back to my in-class document, rejiggered it, and did a save as/overwrite of my original guage doc. Whatever, it's working now.
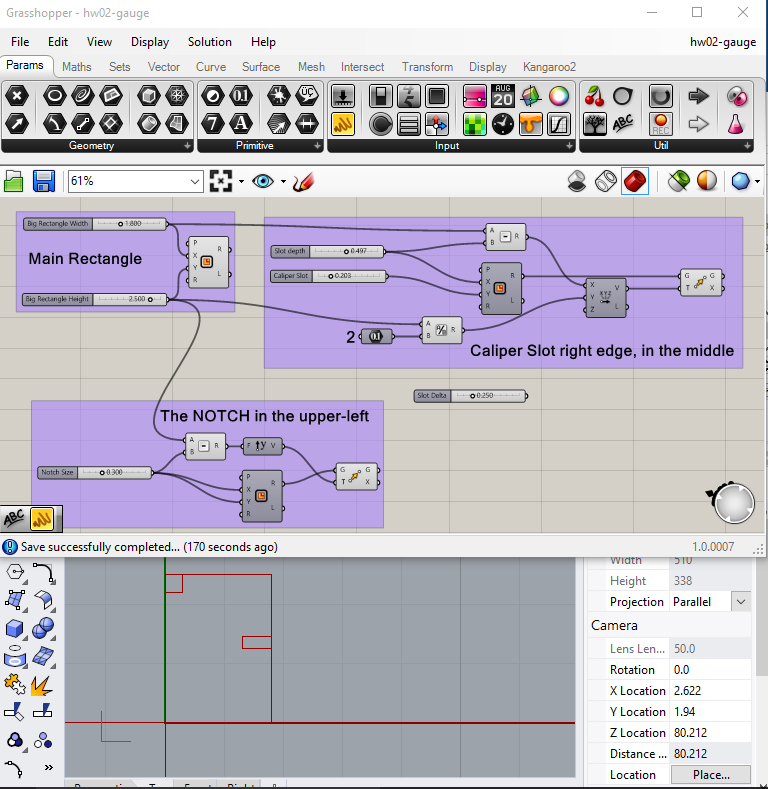
Okay, on to the main event, let's make the actual "gauge slots ..." well that was more complicated than I thought. Good thing I found the Group function or I'd be going nuts about now.
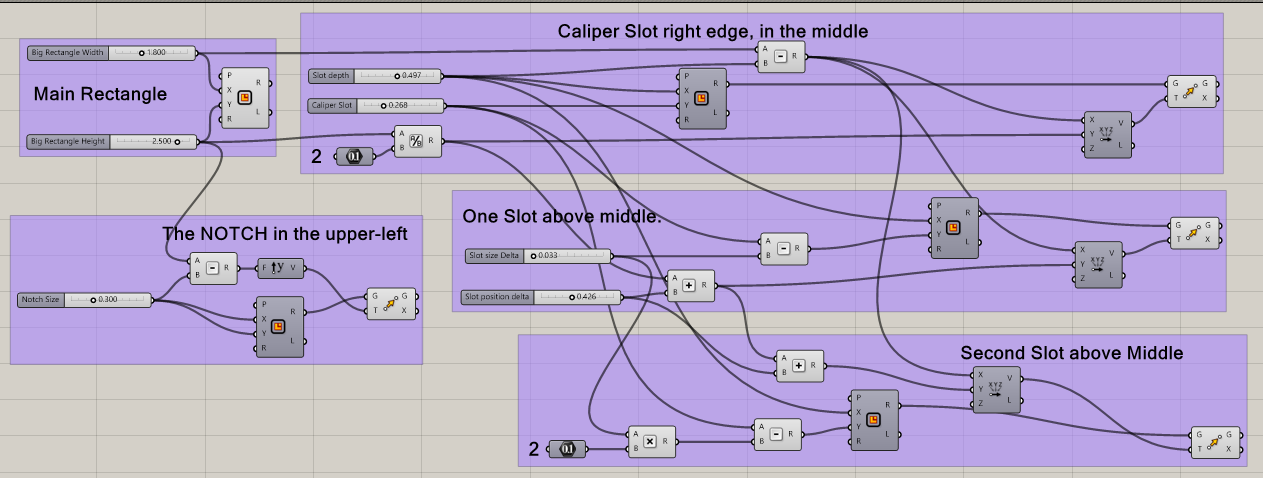
Now let's get those other slots. We want three above the middle "caliper slot", each of which 0.002 in. smaller than the previous. Same thing below the middle one, but 0.002 larger. Getting pretty hard to avoid a rats' nest ...
...but it works!
Okay, three slots left ... we can do this. Turned out to be ugly as hell ...
Still works, though.
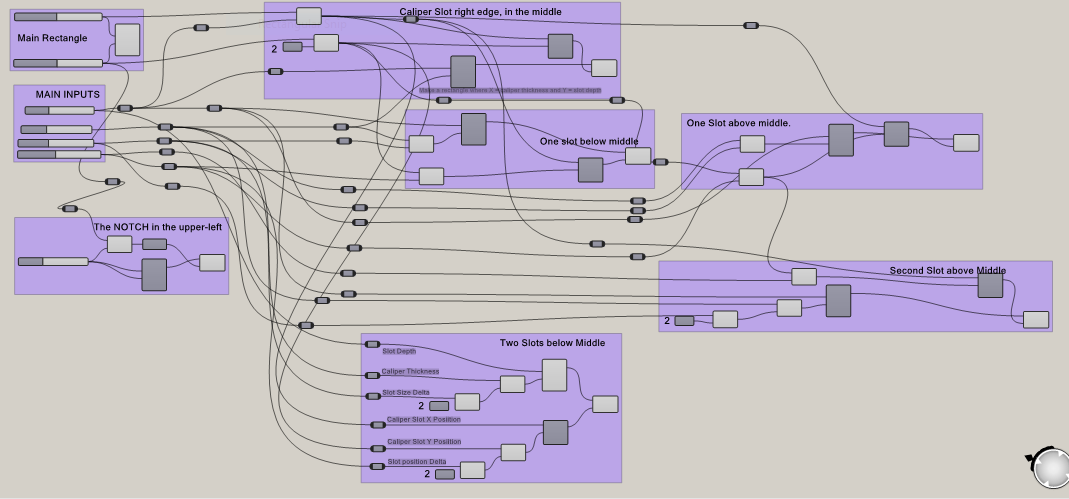
I thnk I figured out how to make it less crappy. I used relays & Scribbles To label my inputs for the bottomost slot.
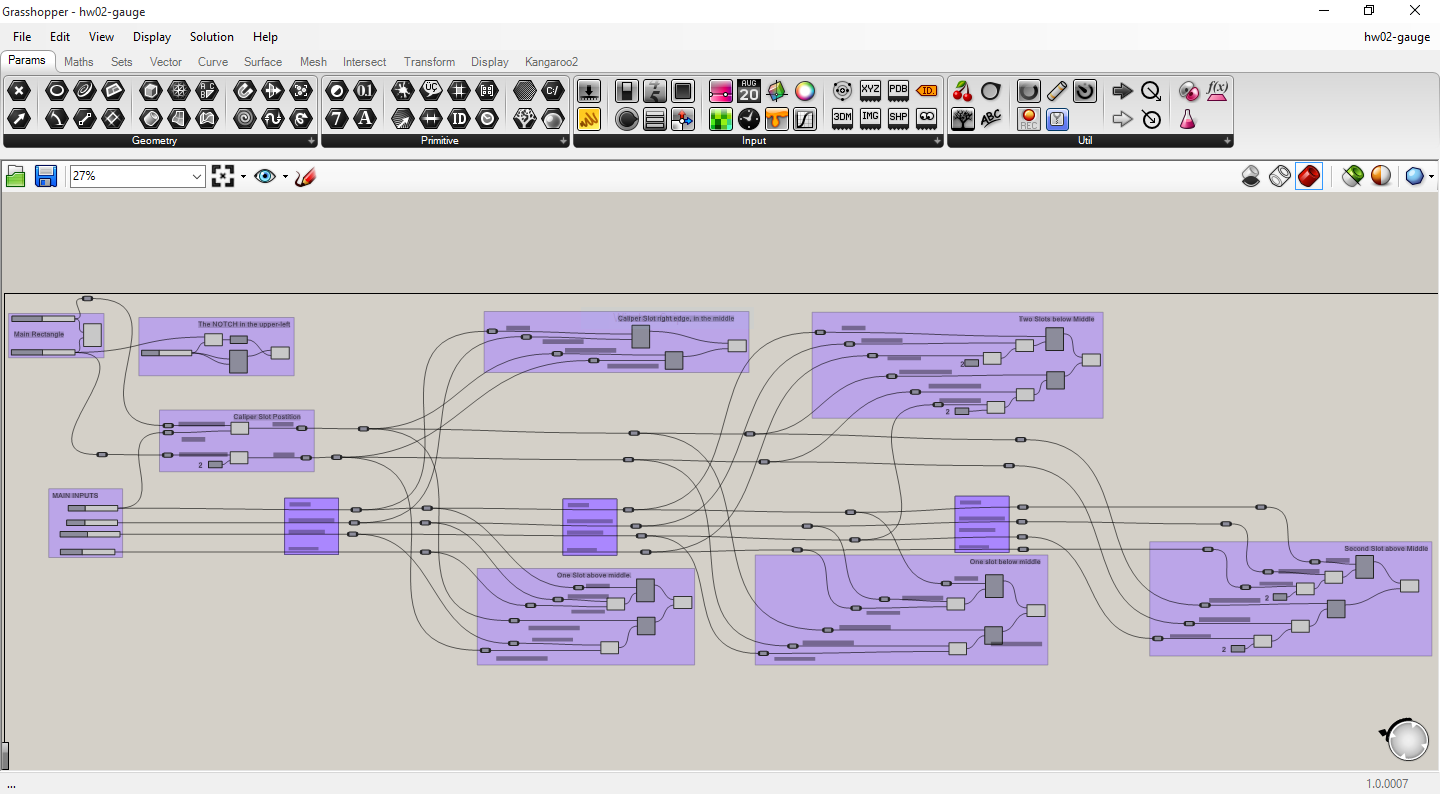
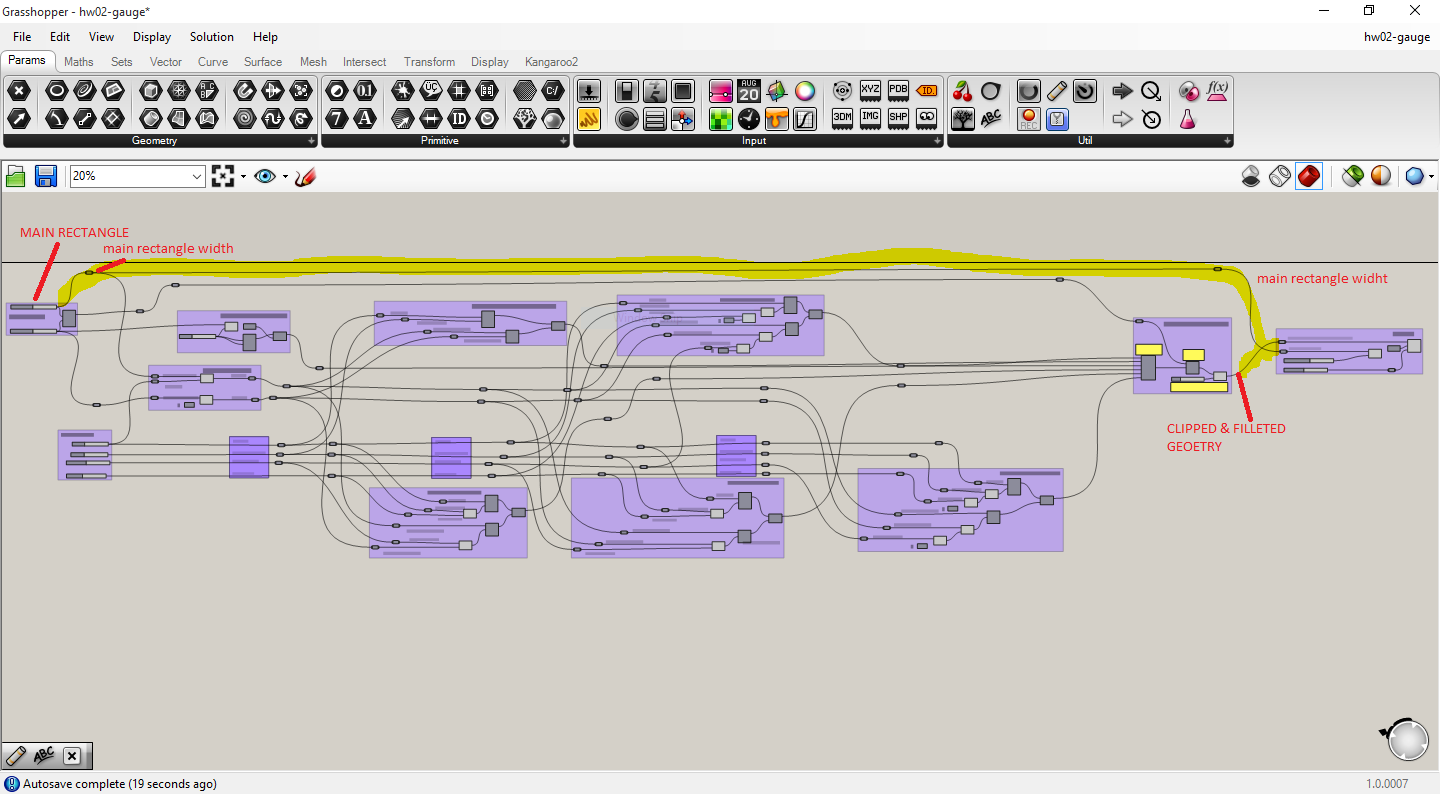
So, all of last night in the UW MILL ended up being a massaive Grashopper CAD-fest. Didn't print a darn thing. Ended up with a functional Guage, but the wiring was a complete and total rat's nest. So how did I decide to start Day Four? Plowing ahead with fillets and printing? Oh no, I just had to fix those wires. Pretty happy with the results, thought.
Grouping and labelling really helped. Each group is like its own little "chip" with specific inputs and outputs.
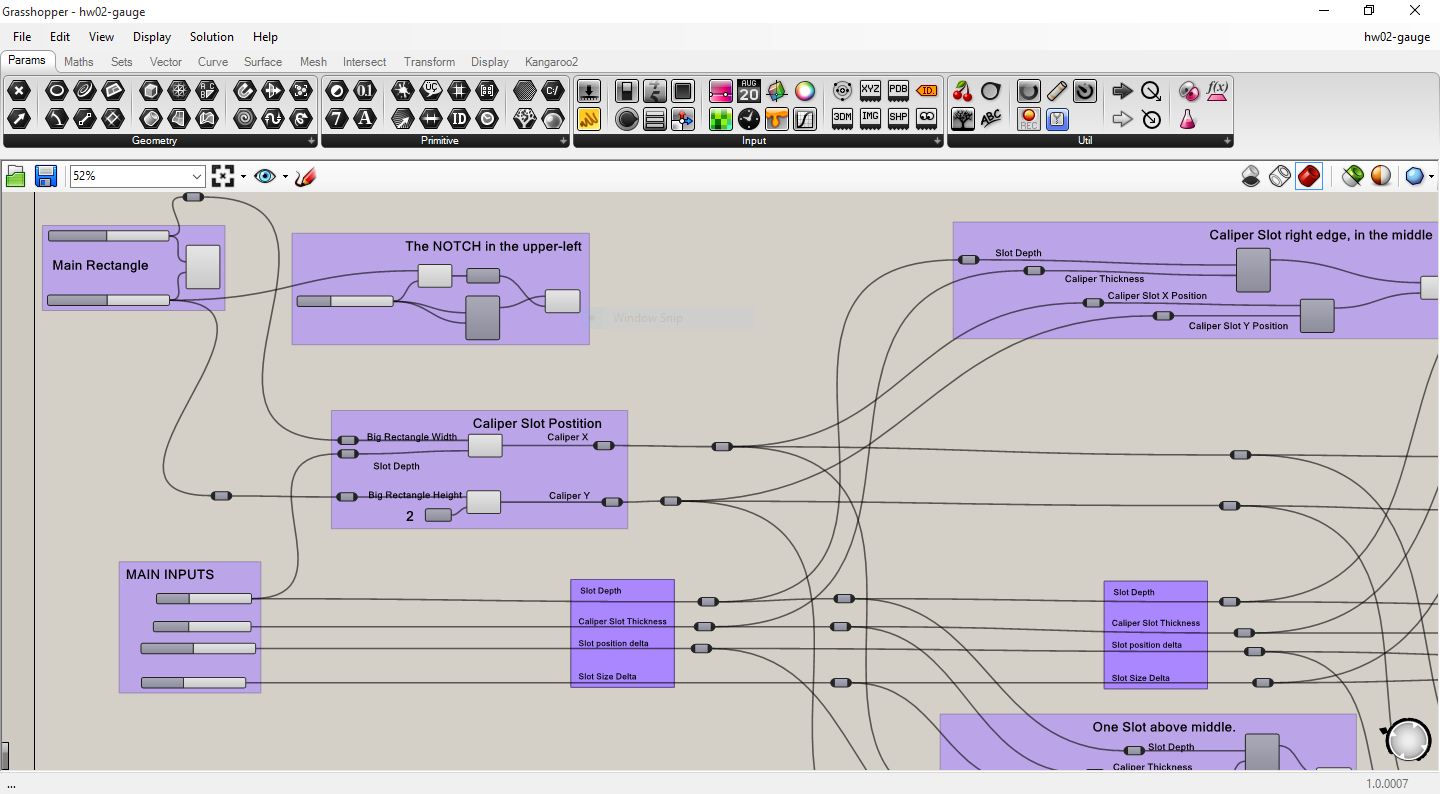
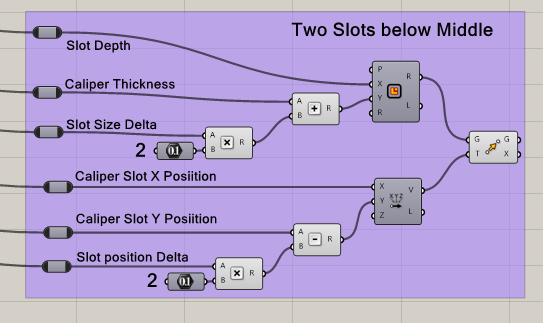
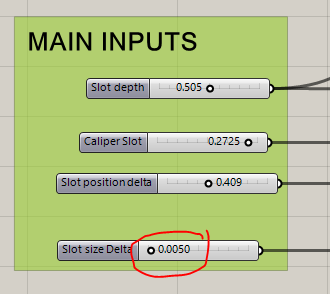
Relays helped, too. Easiest way was to (gasp!) unwire eveyrhting, then redo wires with relays, and little "label groups" that helped me keep my Slot Depth, Caliper Slot Thickness, Slot Position Delta, Slot Size Delta all straight.
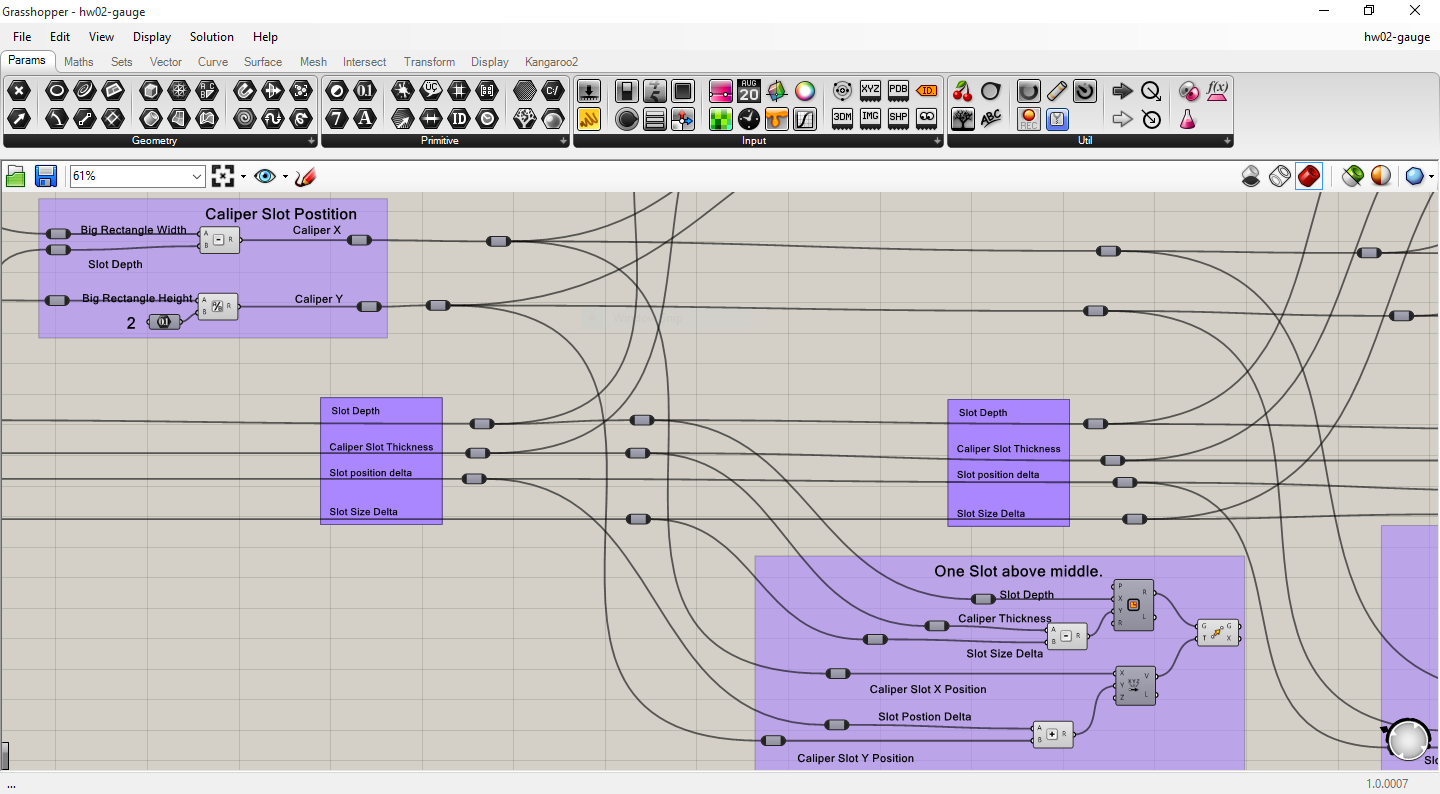
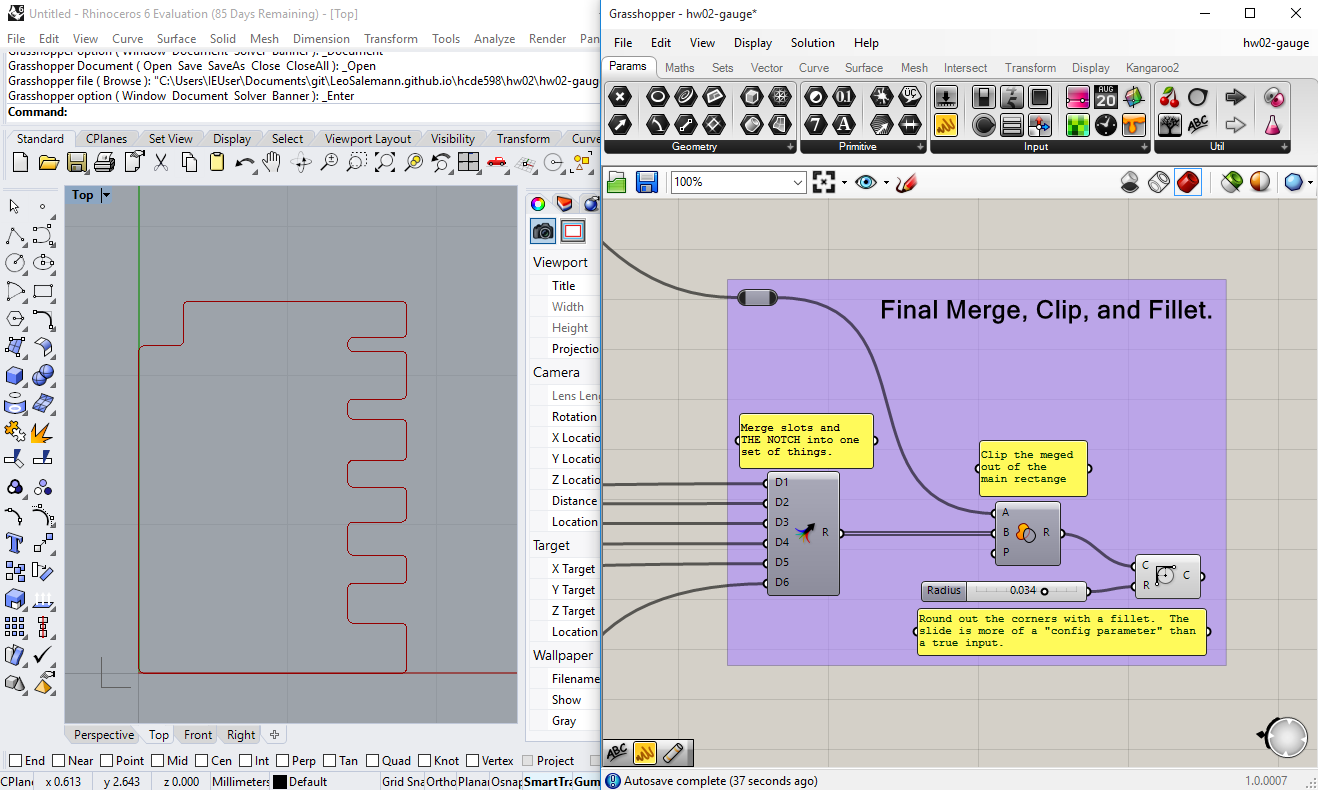
Let's try Gabi Duncome's advicd of Merging THE NOTCH and all the slots into one thing, then use Region Difference once. Turns out I need to use Grashopper's funky Zoomable User Interface (ZUI) to add enough inputs. In my case, I need six.
Huh, something was almost ... easy. My Relay game's solid enough that I could wire this up without rat-nesting again. Then I had to disable Preview on the intermediate shapes and ...
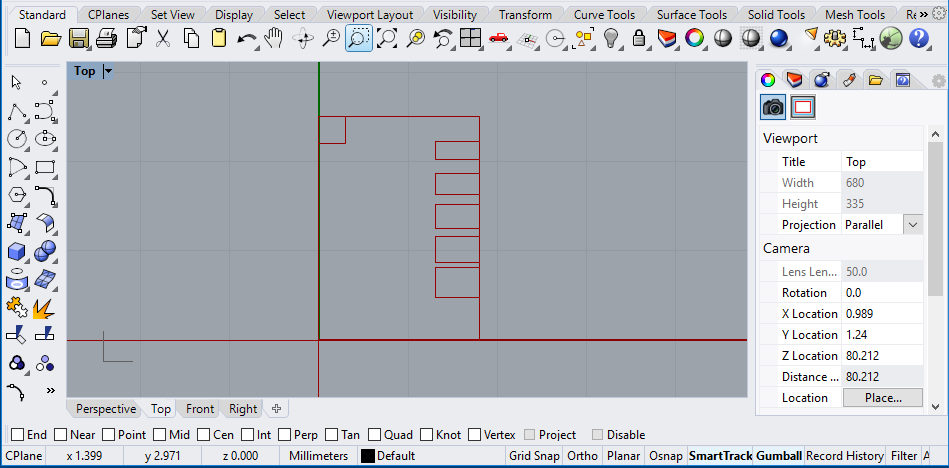
Finally, figured out how to Fillet. S'pose I could have gotten real fancy and only fillet the outer corners of the caliper slots, but I've had enough masochism on this assingment so I'm just going to fillet everytning and call it good.
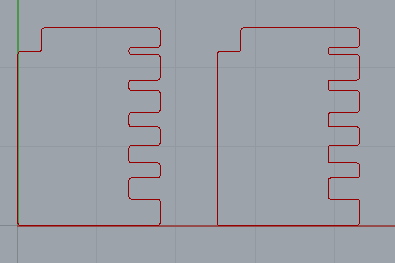
Got so excited seeing my complete geomety that I forgot there's even more to do before I can print. Gotta dupe it so I have two, bake it, then do whatever else is needed to get the final rhino file ready for the laser-cutter.
First-off, let's dupe the gauge. This is actualy a good time to document the "Groups and Relays" technique I've developed to avoid rat-nesting. In this case, my goal is to have two copies, side-by side. I know I'm going to need a Linear Array component and an Unit X Vetor. To avoid overlap, I need to use the width of the "Main Rectangle" I used when starting the guage. There' also going to be some multiplication involved, and ... I may as well ad control for the number of copies to make. Using Relays, Scribbles the other elementes mentioned above, I can lay out the basic parts and group them.
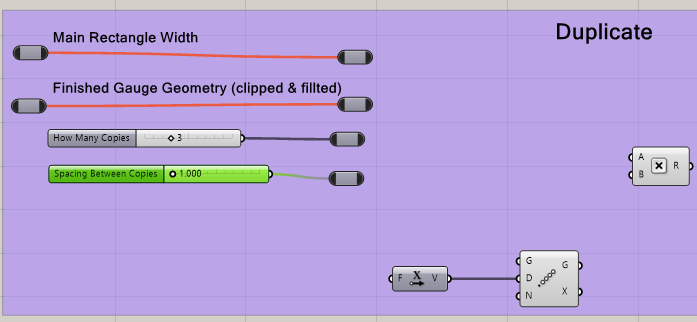
Now I can wire up the internals, re-arranging elements if I need to.
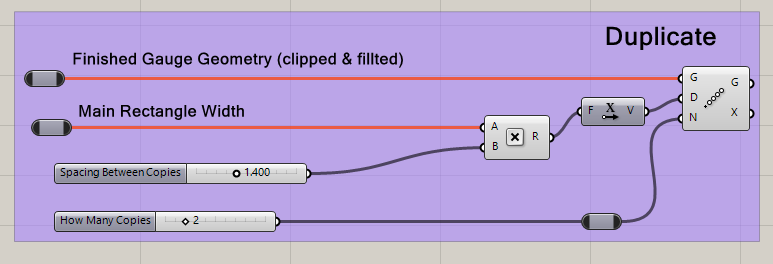
Yup, a lot of shuffling occurred already. With the internals squared away, now I can wire up the externals for the "Main Recangle width" and the "Finished Guage Geometry."
And whattaya know? It worked on the first try.
I got some time to kill at home before heading to the MILL later tonight, so I'll keep cadding.
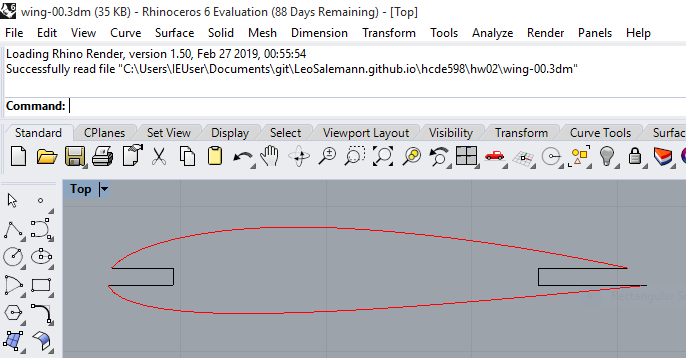
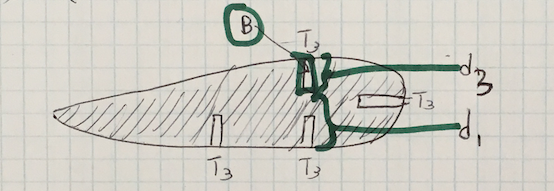
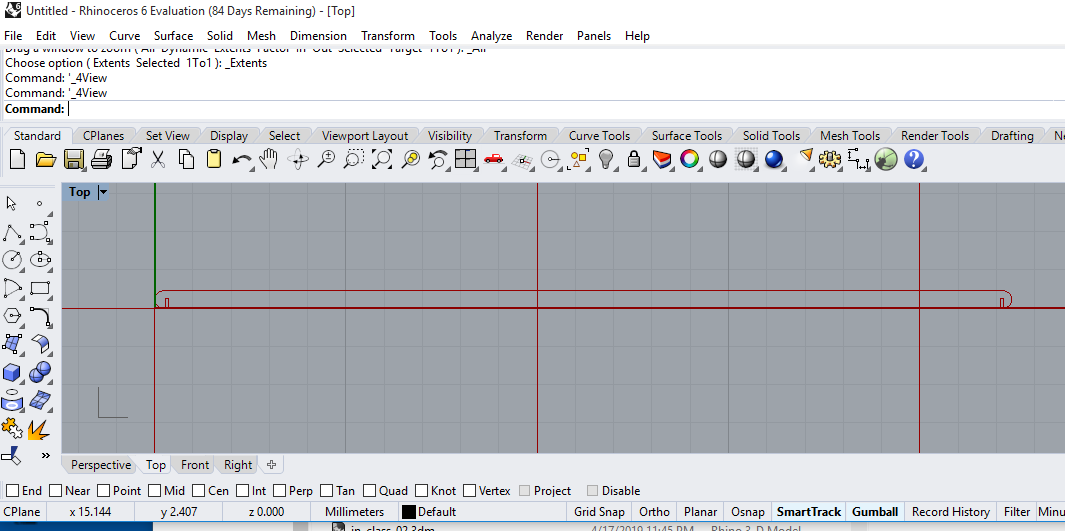
All that work and I don't have a wing yet. Hope I can use that NACA generator, but I may need to punt and use the airfoil from assingment 1. Let's start with a spar. I'll need a wingspan, spar thickness, airfoil cardboard thickness, and slot depth. Same Merge, Region Difference, and Fillet as I did for the gauge.
Now the slots. Need to make the basic rectangle (airfoil-thickness x
slot-depth), space them evenly across the spar.
TBD discuss the success at putting slots at the two ACKNOWLEDGMENTS
Between my garage, the MILL, and (ahem) the Post Office, I've been able to scrounge up a healthy assortment of cardboard thicknesses and sizes.
Okay, so given these choices, my order of preference is ...
So I need to generate three pairs of gauges for the three thicknesses.
Pull up my Grashooper doc, set the Caliper Slot to 0.1466 in.
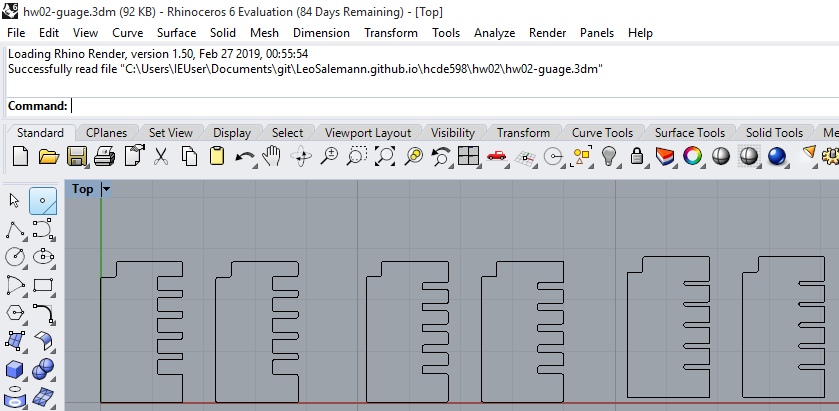
After baking, I grab the "fresh" geomety, move it in X then set a new caliper thickness and rebake. Repeat until I have three gauge pairs.
For export, I had better luck going straight to Adobe Illustrator rather than through dxf. Only trick was to select 1 mm = 1 inch.
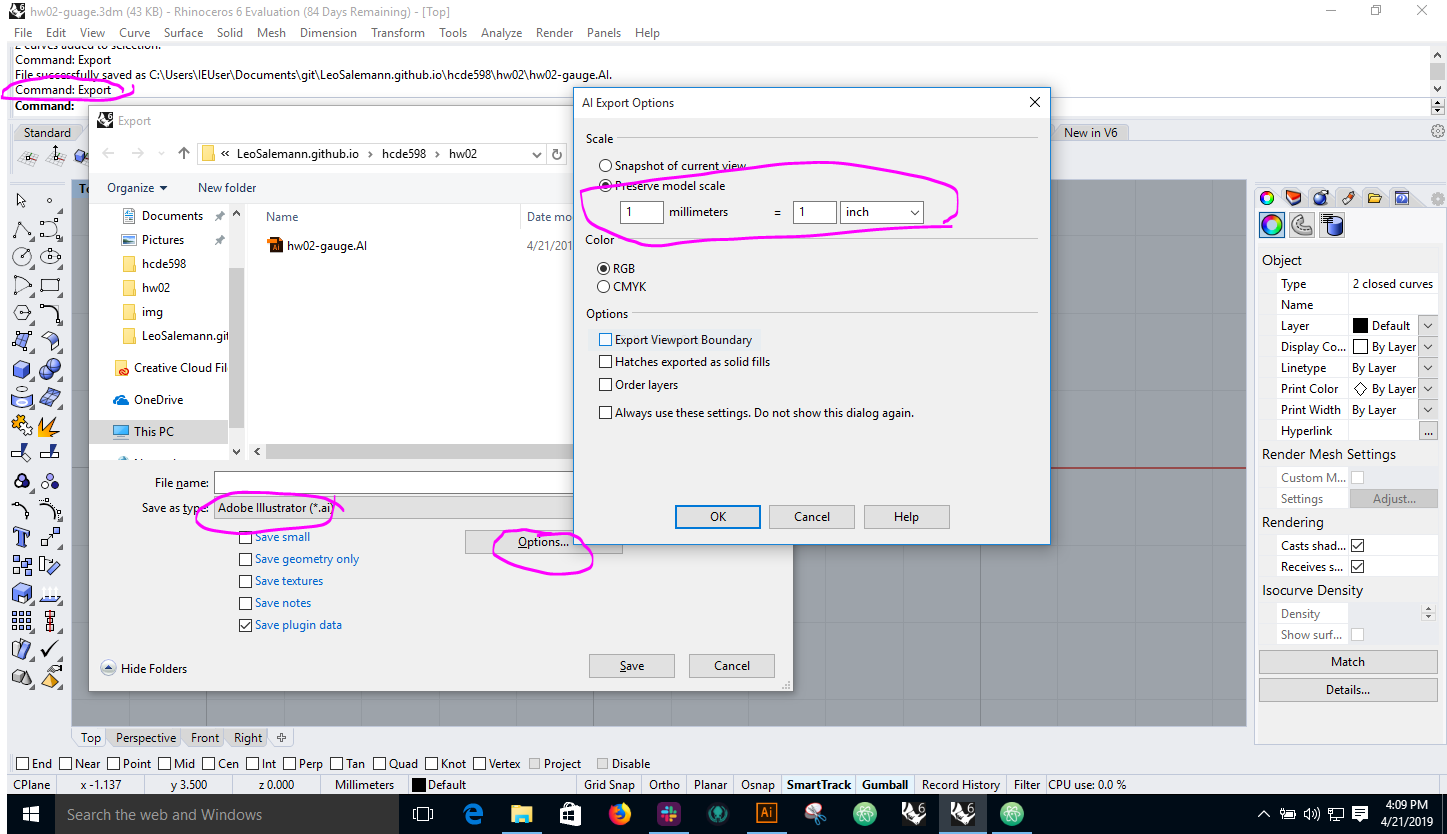
Once in Adobe Illustrator a had to move the geometry from the bottom-left corner of the doc to upper-left, then resize the artboard to match my cardboard size, and set the stroke width to 0.001 in. Seem reasonable, especially since I'll be resizing the AI doc for specific cardboard size, not to mention compensating for holes and other odd cardboard shapes.
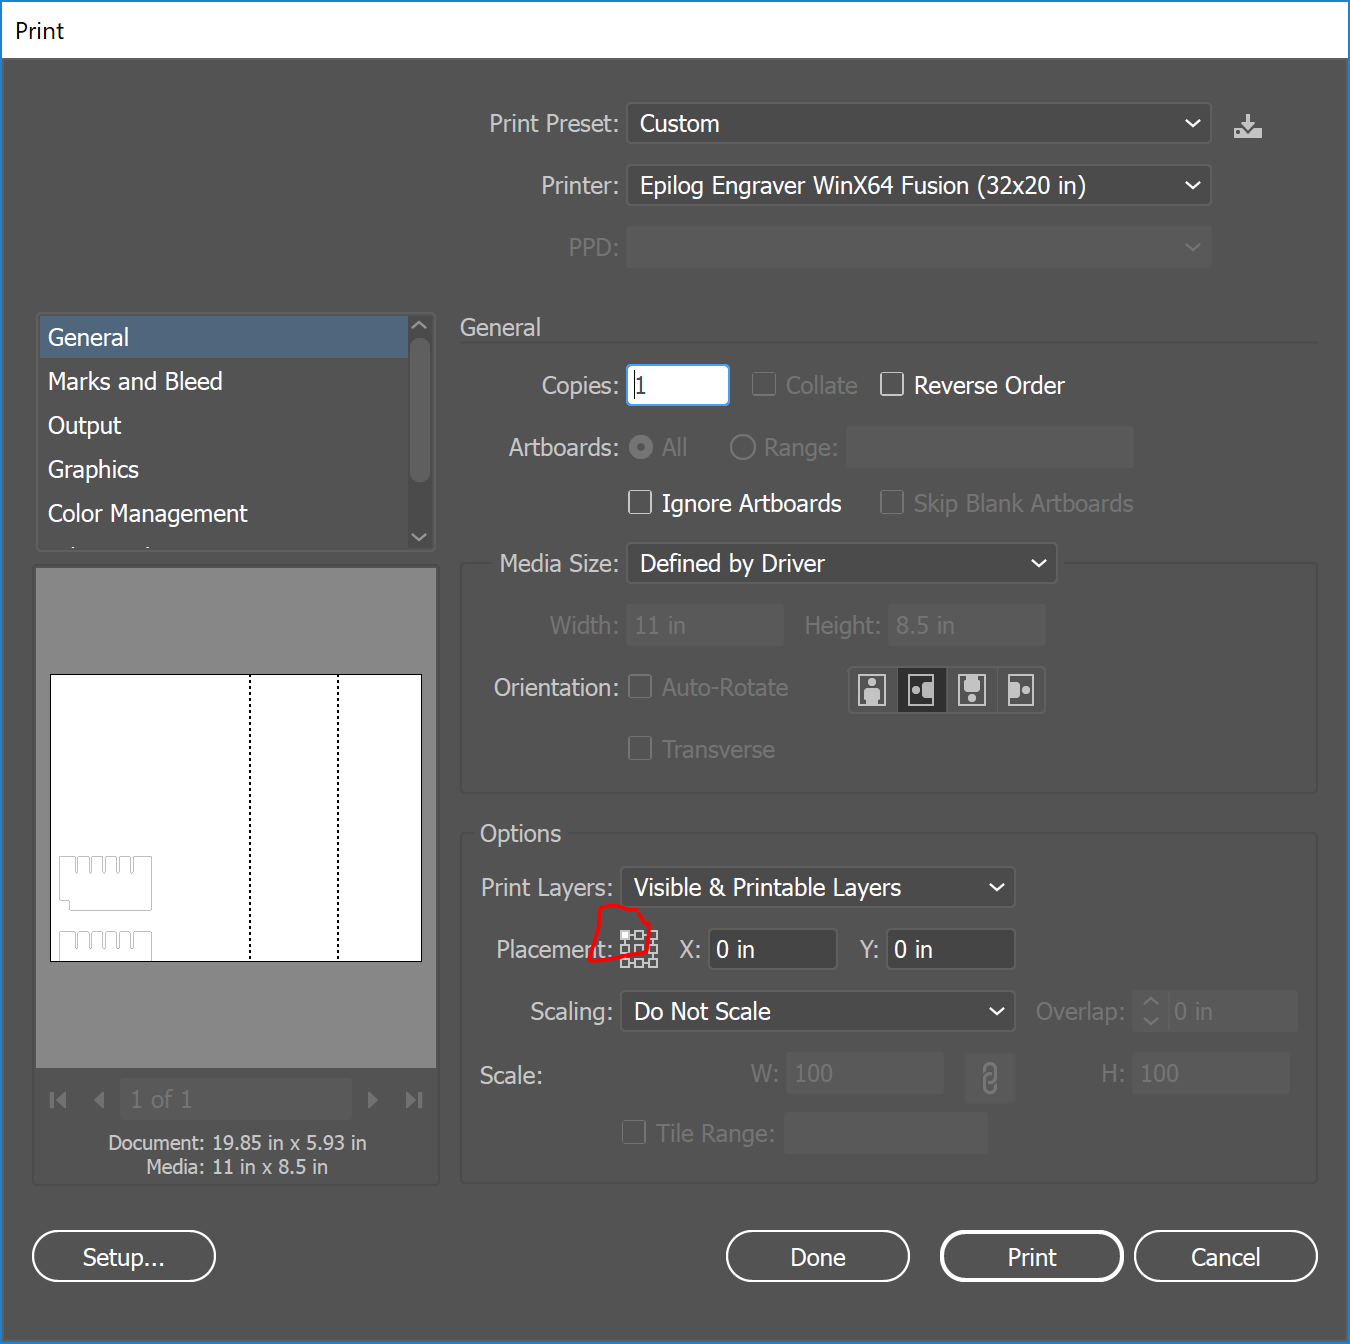
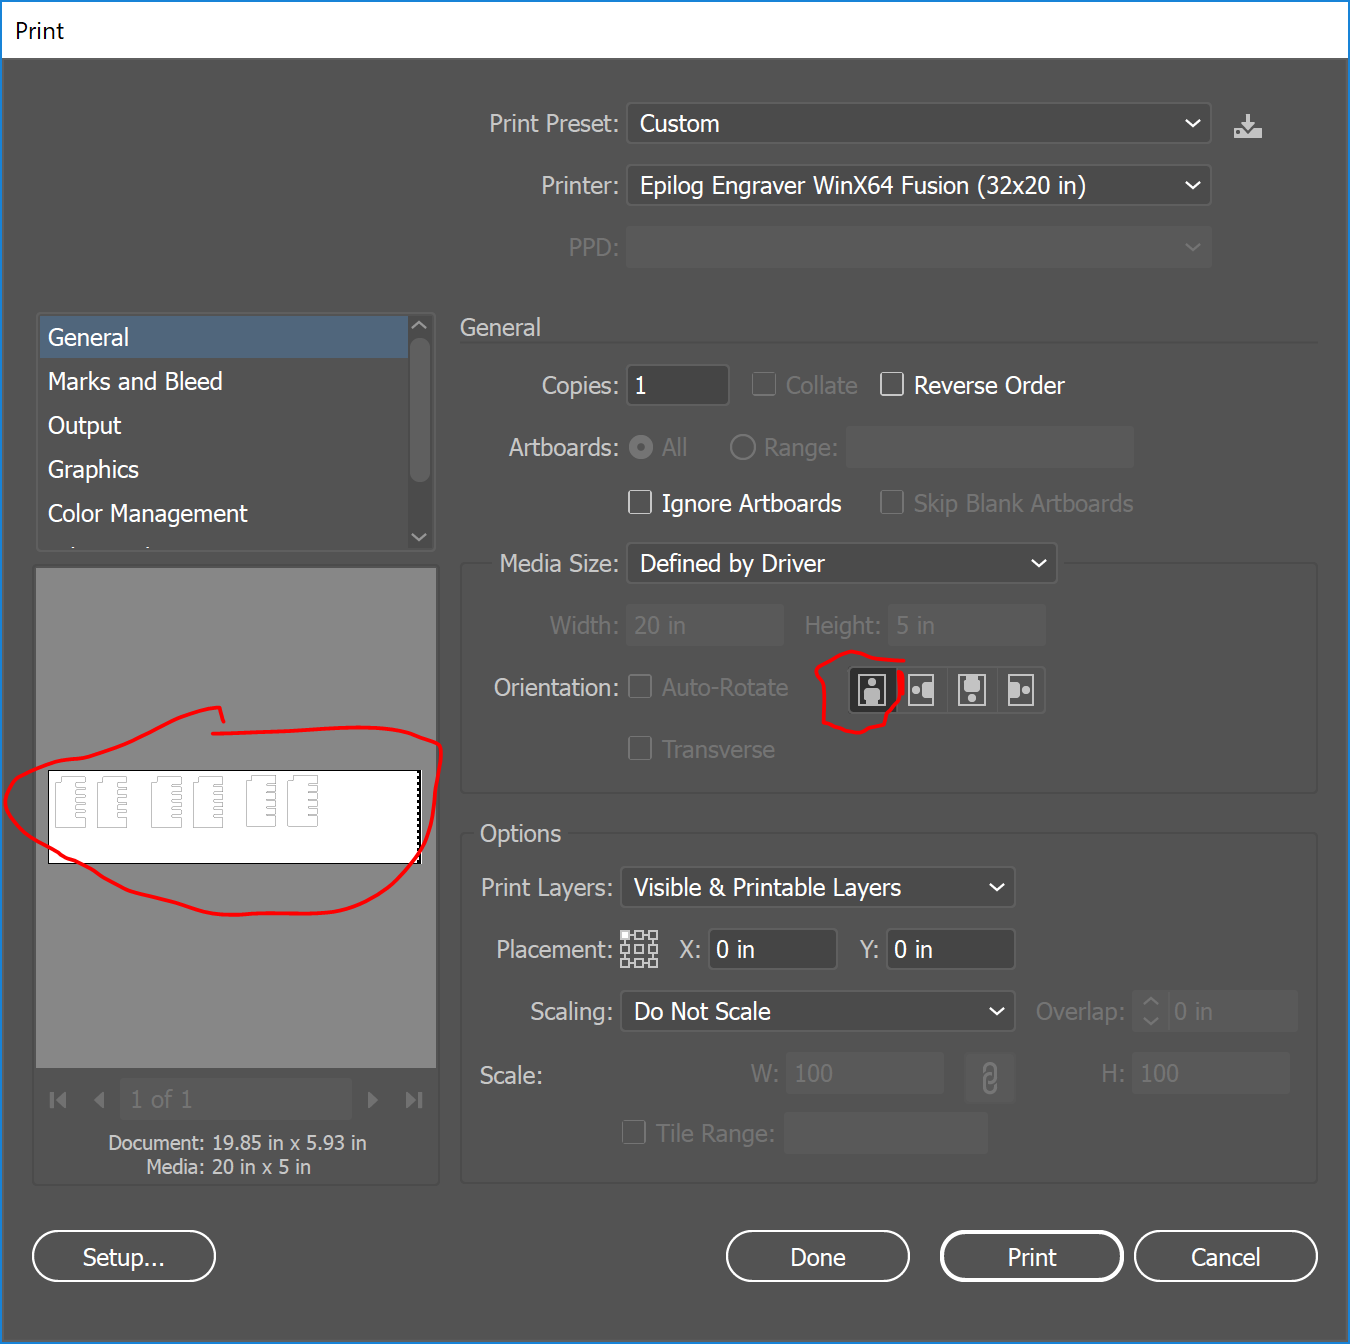
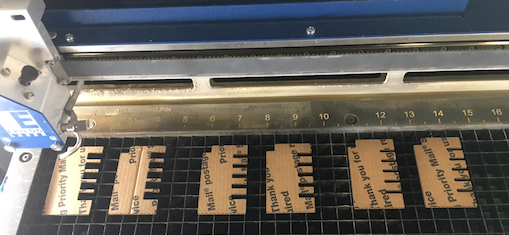
Okay, off to the laser cutter! First-up, Imma try my super thick TV box cardboard. Get the placment n the upper-left corner.
Next up, epilog.
Back to Adobe Illustrator settings. Some how my Orientation was messed up so I hdat to set it to portrait. Now the preview looks good, and I'm ready to print.
Hm. even at full power, it didn't cut thru the tv box, stopping at the last layer. Looking at the dot pattern on the back side, I think I need to slow down the speed.

Try the postal board. Nice clean cuts, good and stiff. On the minus side, all my slots are too loose for everything :(.
Try the costco carcboard. Also worked. Y'know ... I should have refocused the laser when switching material thickness. Good thing the epilog is forgiving. About the same thinness as the usps box, but not nearly as stiff.
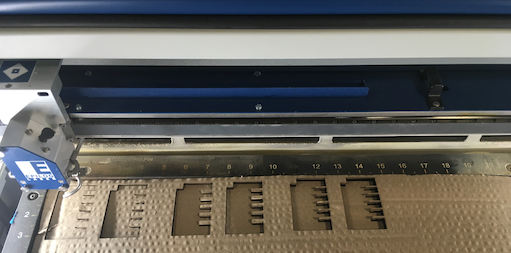
Well, crap. Almost all my gauge slots are too loose for everything. The only one that worked was for the regular science fair trifold cardboard. Even then, it wasn't the middle slot that matched the calliper -- it was the smallest notch -- that was two "deltas" smaller.
So ... yeah, almost all my guage slots from yesterday are too big. Let's measure the actual gap size with calipers, and compare to what we see in Grasshopper.
My grashopper file was last used for the TV Box cardboard, so I'll start with that one. Caliper slot still says 0.2725, let's measure the what actually got cut.
| Slot | Caliper Measurement | Grasshopper Measurement |
|---|---|---|
| 1 (top) | 0.2750 | 0.2625 |
| 2 | 0.2795 | 0.2675 |
| 3(caliper) | 0.2980 | 0.2725 |
| 4 | 0.3040 | 0.2775 |
| 5 | 0.3015 | 0.28.25 |
Well, no wonder -- I had my slot size delta set to a mere five one thousandth's of an inch! That's why they're so similar I can barely see a difference in the calipers.
Now, about that one anomalous case that actually worked. Yesterday, I had set the caliper measurement to 0.1465 which means the smallest measurement would have been 0.1365. In other words, I had to reduce my caliper measurment by 0.01 for a just-barely tight enough fit.
New Plan I'm going to use a delta of 0.02. Idealy, the smallest slot will be too small, and the middle or one the one just above or just below will fit. Also, re-measure the cardboard. This time, I took my caliper and measured each cardboard 3-5 times, looking for the smallest measurment that still fit. Then, I scrolled up in this doc to look up yesterday's measurements.
| Cardboard | Today's Measurment | Yesterday's Measurment |
|---|---|---|
| TV Box | 0.2530 | 0.2725 |
| Trifold | 0.1205 | 0.1465 |
| USPS | 0.0580 | 0.0835 |
So yeah, everything's waaayyyyy smaller than yesterday. Time to fire up Grashopper and re-run the bake export Adobe Epilog pipeline. This time, I'll use a size delta of 0.05 in for the TV Box and Trifold, and 0.015 in for the super-thin USPS box. Once again, I have six guages; but this time, I'm going to isolate each one to its own Adobe Illustrator layer, so I can print them one at a time, tinkering power/speed/frequency settings between runs.
This time around, I set the orientation correctly from the get-go.

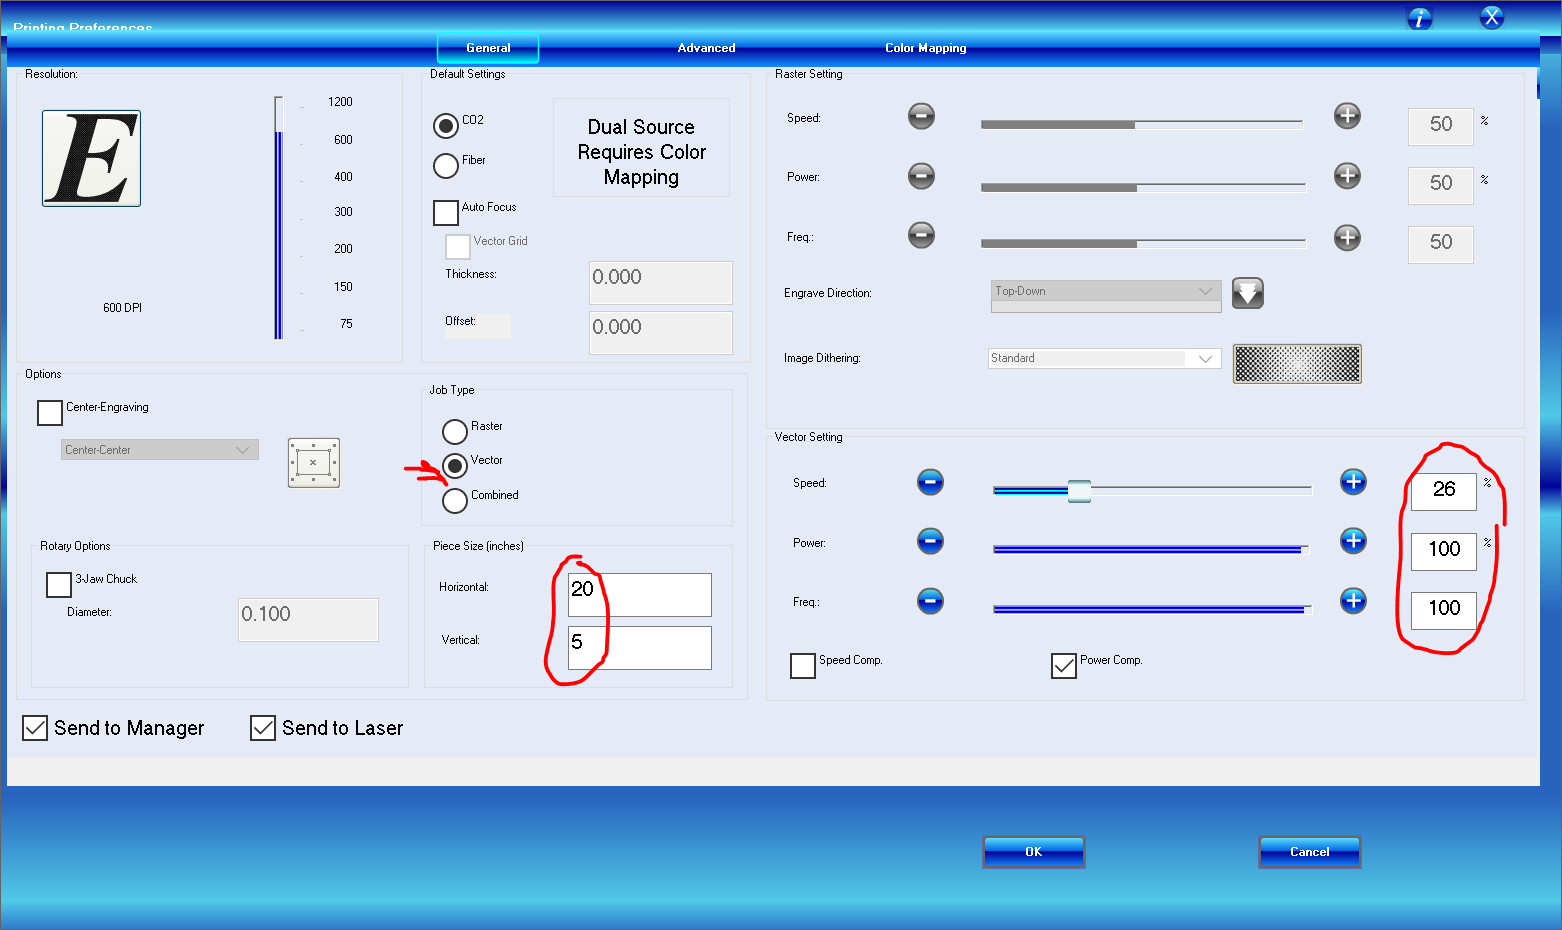
Rather than the traditional 25% speed, I took it down to 20%

Dropping speed from 25% to 20% helped, but still not 100% cut.
Try 15%. Successful 100% cut. Tricky to pull out though, so keep dropping.
Try 10%. Perfect! The parts fall right out now!
Try 12%. Will the parts till fall out if I take it back up to 12%? Yes!
Try 13% Still working, but resists a bit more.
Try 14%Still works.
So, a speed of 14 cuts all the way though while providng a bit of a safety factor.
Got another full set of six gauges. Trying to fit against the super-thick TV Box, the regular-thick Science Fair Trifold, and the super-thin USPS box.
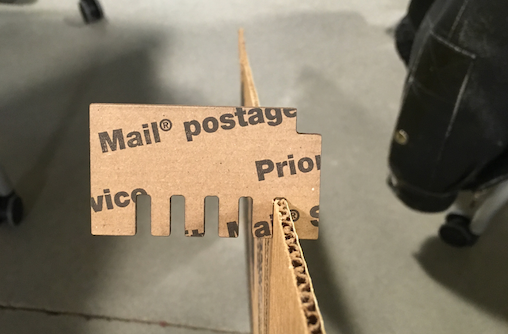
TV Box. The middle slot fits, but not as tight as I would like (below). One shake makes it drop. The next slot up is too thin to fit at all. Everything else is loose enough for parts to fall out. I could go with this, or do one more (seriously?) guage with a smaller delta-thickness.
Science Fair Trifold The middle slot has the same "tight enough but almost too loose" feel as the TV Box case. The next slot up (thinner) has a realy satisfying grip, holding up to vigorous shaking.
USPS Box I wouldn't trust the middle slot, but the next one up is very trustworthy. Totally shake-resistent. Almost feels like it was glued. Based on my Grashopper parameters, this slot is 0.0580 - 0.0150 = 0.0430 inches.
Gotta use the USPS cardboard. Thin, stiff, and we have an excellent slot width figured out. Using the TV Box for spar Material is equaly irrestible -- really higlight the thickness difference. So we'll do big thick strong spars, with thin little slots. The airfoils wil be super thin, but with very wide slots.
So, the next guage set will be cut in USPS cardboard. Last time 0.2530in was a tad too wide, and 0.2330 was hopelessly narrow. We could have the largest gap at 0.2500, and the smallest at 2400. A good sequence would be 2400, 2425, 2440, 2460, 2475, 2500, and who am I kidding I don't have time to keep tweaking this.
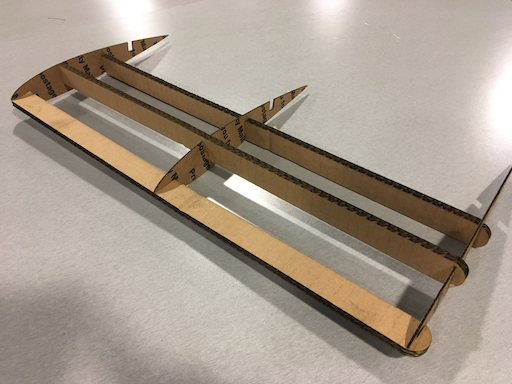
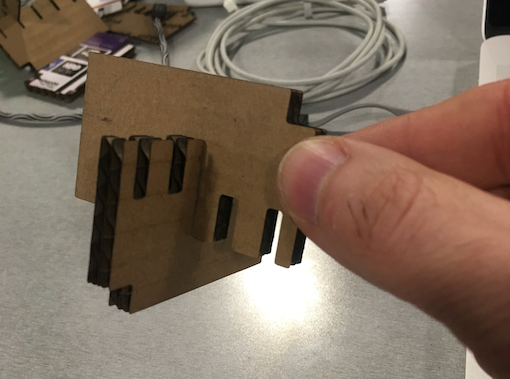
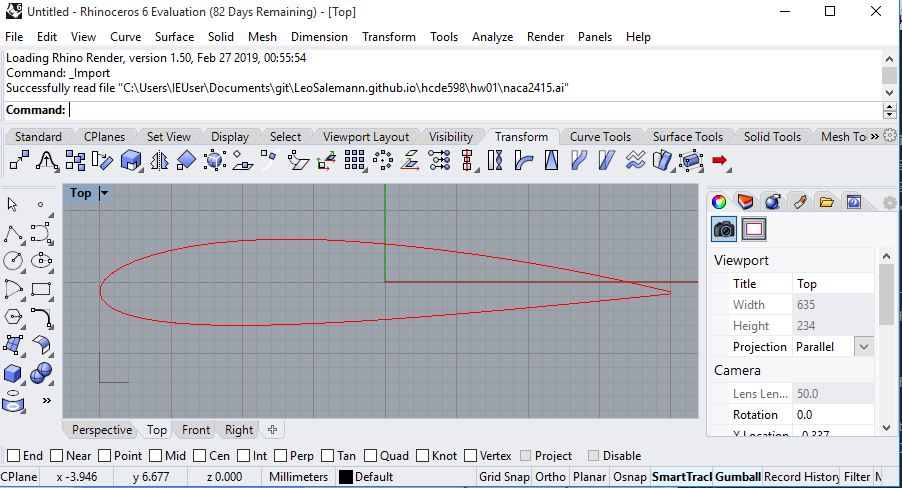
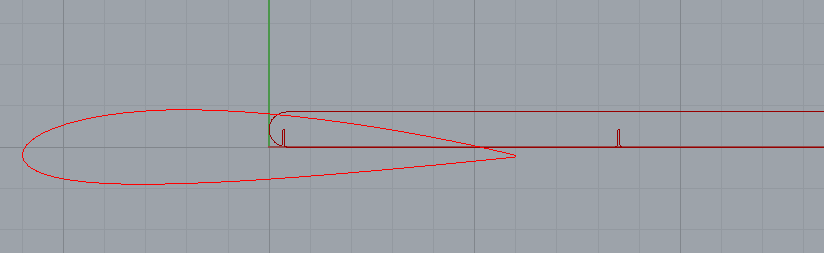
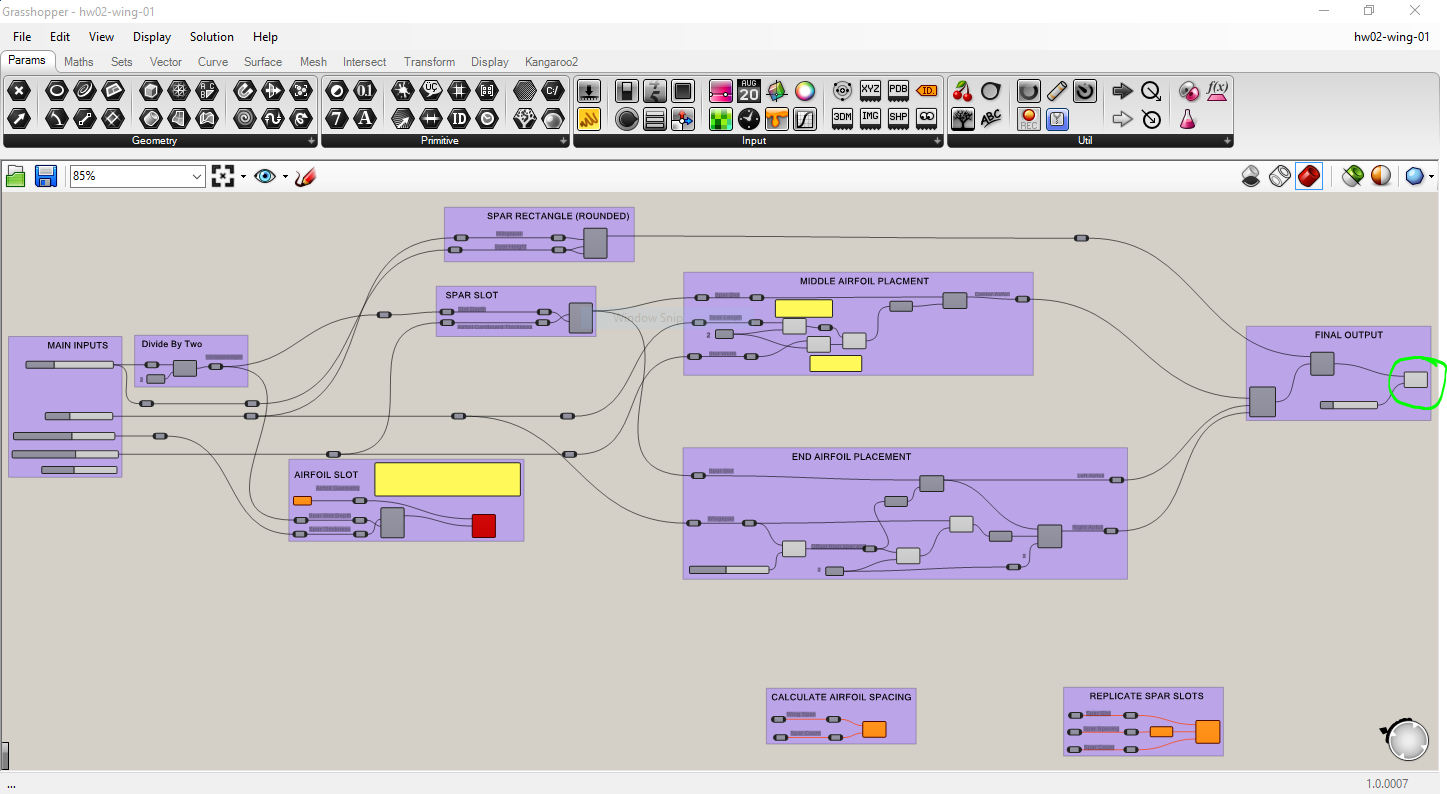
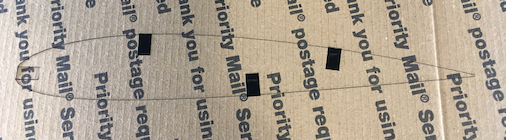
Four hours of build time left? I'm not worried at all. The slot for the large cardboard isn't perfect, but it should be enough for reasonaly shake resistant build. Back on Day 4 I built an initial wing spar with a slot at each en, just need one more in the middle. No time to use that Grashopper airfoil generator (sniff) so I'll just re-import the SVG one I used in homework two. Three ribs, Three spars, six parts, two thicknesses, good enough.
Okay, whipped out a center slot generator in short order without obsessing on perfect wiring.


No need to replicate the whole spar; I'll just generate one multiple times, adusting thickness and slot depth for each baking. On to the airfoil.
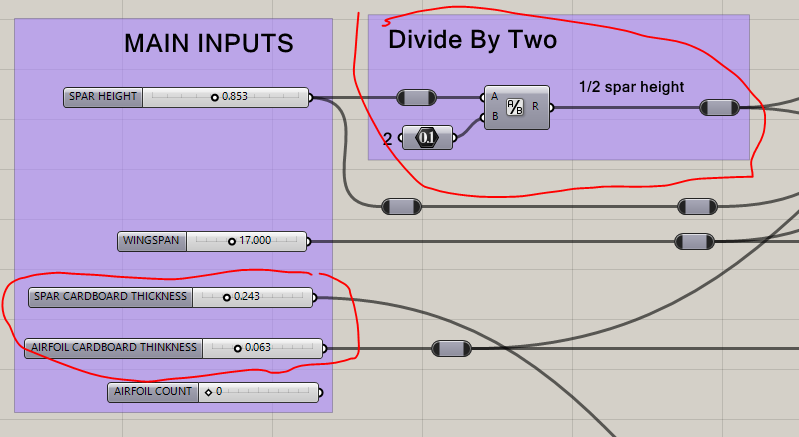
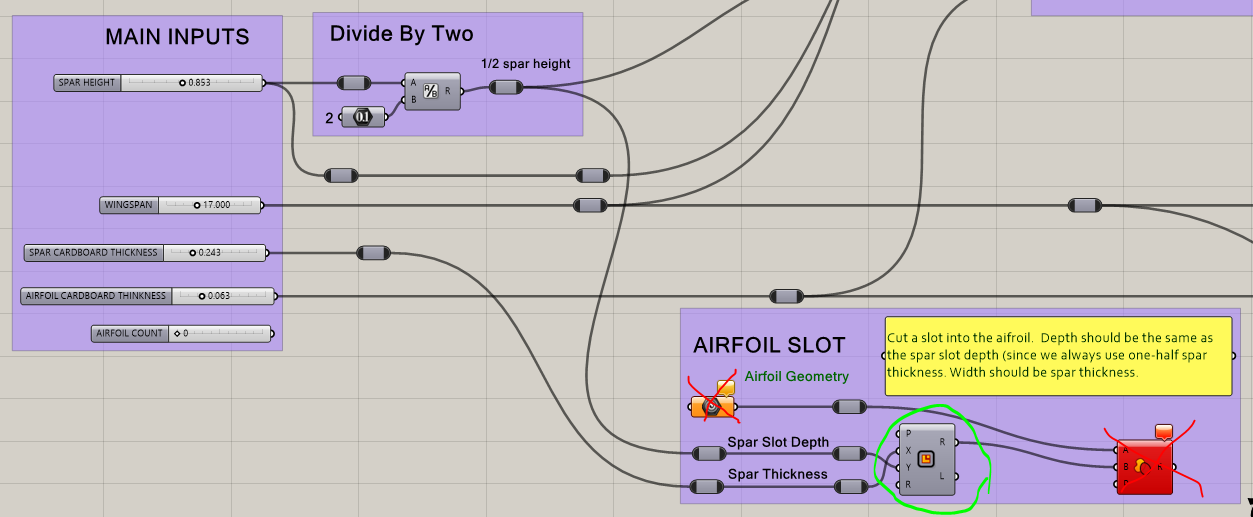
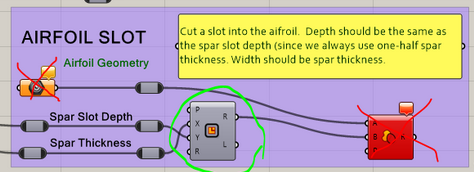
This is where I got quick, dirty, and way less parameterized. I had to abandon Dr. Peterson's NAC Airfoil Generator and import my own from Homework 1's Adobe Illustrator file. I tweaked around some of my Grashopper inputs to set the spar slot depth to just be one half of spar height. Also added a Spar Cardboard thickness input. Now I can key in the thicknesses I gleaned from the Guage-Making Death March that consumed my whole week.
I also added a module to generate the rectangluar slot that needs to be cut into the airfoils. To summarize:
So with that said, I basically just needed a rectangle component wired to the right inputs. I tried to get fancy connect it direclty to the airfoil geometry from Rhino, but couldn't get it to happen in time so I just went with the output of the Rectangle.
Uh-oh. It's past 10:30. No time to do all the auto-repliaction I did for the gauge. Just going to bake, replicate, and bake again like this:

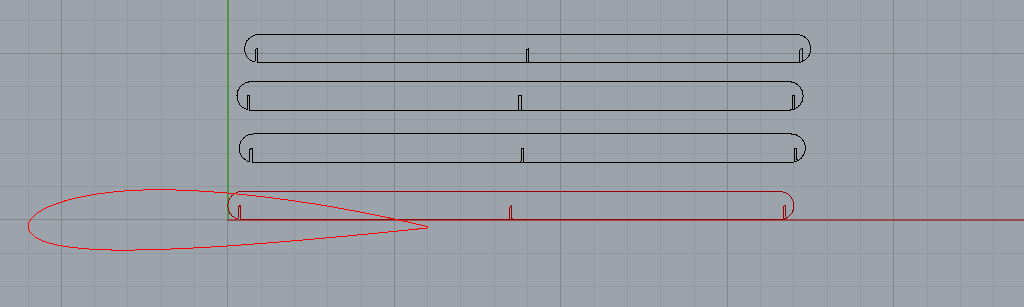
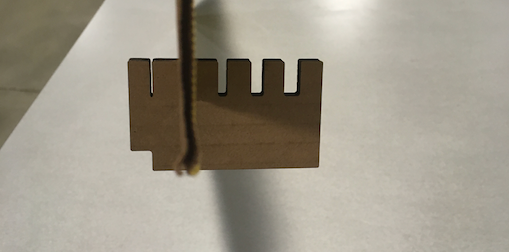
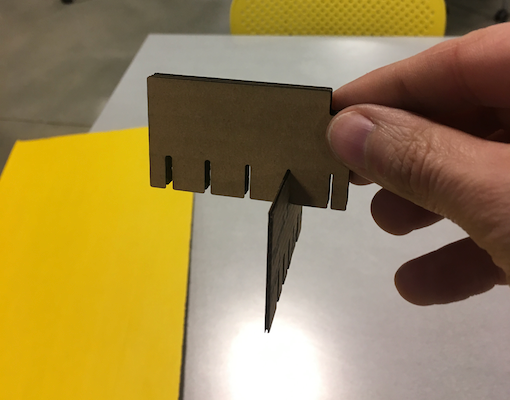
What'd I tell you? No x-acto required.
Printing was somewhat uneventful. I used 100% power, 100% frequency at all times. Used 25% speed for the thin airfoils; 12% speed for the thick spars. Once agian, Layering in Adobe Illustrator let me control which parts get printed when, so I could print one at a time and adjust if needed. The wierdest thing was the draw order for the spars -- the line sequencing skipped around a bit, and the whole thing got lasered twice. No fires, but I had to wash my hands after handling them.
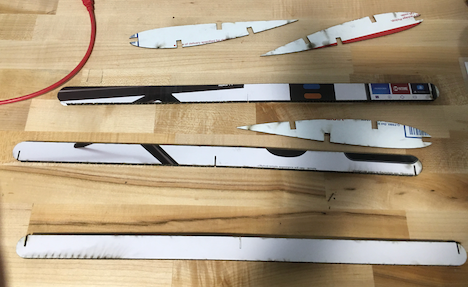
Assembly was satifying, tight flush fits eveyrwhere ... until I figure out I had more slots than spars in the airfoil.